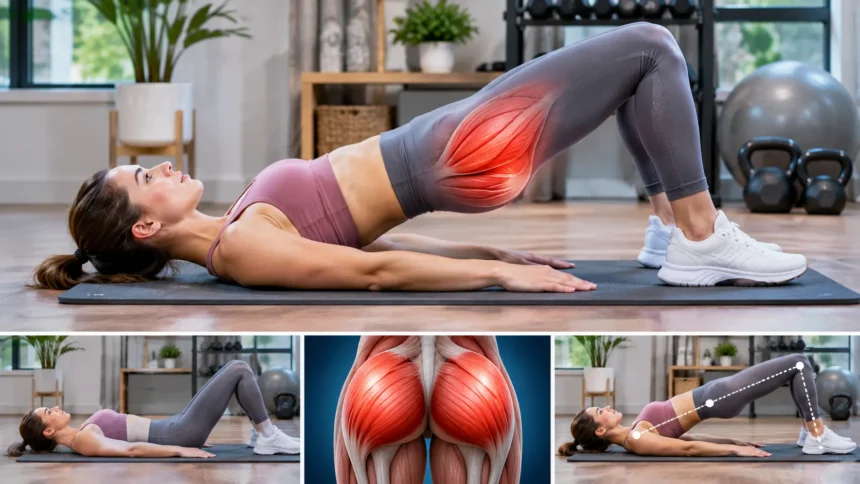
Glute bridges are one of the simplest exercises for strengthening the muscles around your hips and improving lower-body stability. They require little equipment, making them suitable for home workouts, gym sessions, and beginner-friendly fitness routines. Whether you want to improve movement control or support everyday activities, this exercise offers several practical benefits.
Learning the correct glute bridges exercise technique can help you activate the right muscles without placing unnecessary strain on your lower back. This guide explains the benefits, proper form, common mistakes, useful variations, and best practices for including glute bridges in a balanced exercise routine.
What Are Glute Bridges?
Glute bridges are a floor-based strengthening exercise that primarily targets the gluteal muscles around your hips. The movement involves lying on your back with your knees bent and lifting your hips toward the ceiling. By pressing through your feet and extending your hips, you activate muscles that support walking, climbing stairs, and other everyday movements.
The glute bridge exercise is commonly included in strength training, warm-up routines, and certain rehabilitation programs. Unlike exercises that require heavy weights or complicated equipment, basic glute bridges use body weight as resistance. This makes them accessible to beginners while allowing experienced exercisers to increase difficulty through different variations and controlled resistance.
Although the movement looks simple, proper technique plays an important role in achieving its benefits. Your feet, knees, hips, and spine should remain controlled throughout each repetition. When performed correctly, glute bridges encourage coordinated muscle activation and provide a useful foundation for learning more demanding lower-body exercises such as hip thrusts and squats.
What Muscles Do Glute Bridges Work?
The gluteus maximus is the primary muscle responsible for lifting your hips during a glute bridge. This large muscle helps extend the hip joint and contributes to movements such as standing, climbing, and running. As you raise your pelvis, the gluteus maximus contracts to create the hip extension needed to complete the movement.
Your hamstrings also assist during glute bridges because they contribute to hip extension and help control the position of your legs. Meanwhile, the gluteus medius and other surrounding hip muscles support pelvic stability. These supporting muscles become especially important during variations that challenge balance or require one side of the body to work independently.
The abdominal muscles and deeper core stabilizers help maintain a controlled position throughout the exercise. They work with the surrounding muscles to limit unnecessary movement through the lower back. Although glute bridges are primarily a hip-strengthening exercise, their coordinated muscle demands make them useful for improving control across the hips, pelvis, and trunk.
Key Benefits of Glute Bridges for Strength and Mobility
One major benefit of glute bridges is improved strength in the muscles responsible for hip extension. Strong, well-coordinated hip muscles help support everyday activities, including standing from a chair and climbing stairs. Regular practice can also improve your ability to recognize and control hip movement, which is useful when learning other lower-body strengthening exercises.
Glute bridges may also support pelvic control and trunk stability when performed with proper technique. The exercise encourages your abdominal and hip muscles to work together while your spine remains relatively stable. This coordination can help build a foundation for movements that require balance and controlled force, although improvements depend on your overall activity and training routine.
Another advantage is the exercise’s flexibility and accessibility. Standard glute bridges require only a comfortable, stable surface and can be adjusted for different experience levels. You can perform them during a warm-up, within a strength workout, or as part of a professionally recommended rehabilitation plan, depending on your needs and physical abilities.
How to Do Glute Bridges Exercise Step by Step
Begin by lying flat on your back on an exercise mat with your knees bent and feet resting on the floor. Position your feet approximately hip-width apart and place your arms comfortably beside your body. Keep your head, shoulders, and upper back relaxed against the surface while preparing to move your hips in a controlled manner.
Gently engage your abdominal muscles and press through your feet to raise your hips from the floor. Lift until your shoulders, hips, and knees form a roughly straight line without excessively arching your lower back. At the top, briefly contract your glutes while keeping your knees aligned with your feet and your breathing steady.
Slowly lower your hips toward the floor while maintaining control of the movement. Avoid dropping your pelvis suddenly or allowing your knees to collapse inward as you return to the starting position. Repeat only as long as your technique remains comfortable and consistent, prioritizing smooth repetitions over lifting higher or completing unnecessary repetitions.
Proper Glute Bridge Form and Helpful Technique Tips
Correct glute bridge form begins with comfortable foot positioning and steady contact with the floor. Your feet should be close enough that you can lift your hips without excessive pulling through your hamstrings. Since body proportions vary, small adjustments may be necessary to find a position that allows controlled movement and comfortable muscle activation.
Maintaining a relatively neutral spine is another important technique consideration. Gently brace your abdominal muscles and lift through your hips rather than pushing your lower back into an exaggerated arch. You do not need to raise your pelvis as high as possible, because the goal is controlled hip extension rather than achieving the greatest possible height.
Breathing naturally can make the exercise easier to perform with consistent technique. Exhale gently while lifting your hips and inhale as you return toward the floor, without holding your breath unnecessarily. Keep your shoulders relaxed and your neck still, allowing the hips and surrounding muscles to perform the movement without creating tension elsewhere.
Common Glute Bridge Mistakes and How to Fix Them
One common mistake is lifting the hips too high by excessively arching the lower back. This can shift the movement away from the intended hip muscles and create unnecessary discomfort. Instead, stop lifting when your hips reach a comfortable extended position, maintain gentle abdominal engagement, and focus on a controlled contraction rather than additional height.
Another frequent issue involves incorrect foot placement or unstable knee positioning. Feet positioned too far away may increase hamstring involvement, while an uncomfortable position can make the movement difficult to control. Adjust your feet gradually and keep your knees generally aligned with your toes so that the exercise feels stable throughout each repetition.
Moving too quickly can also reduce the quality of the exercise. Rapid lifting and dropping may make it harder to maintain consistent muscle engagement or notice changes in your form. Perform each repetition deliberately, pause briefly if comfortable, and lower your hips smoothly to develop better control without relying on momentum to complete the movement.
Beginner-Friendly Glute Bridge Modifications
Beginners can make glute bridges more manageable by starting with a smaller lifting range. Rather than immediately raising the hips into a full bridge, lift only as far as you can while maintaining comfortable positioning. This approach allows you to practice activating the hip muscles and gradually become familiar with the movement before increasing its difficulty.
Using an exercise mat or another stable, supportive surface can improve comfort during floor-based movements. If necessary, adjust your arm position or foot spacing to find a more balanced starting position. People who experience difficulty getting onto the floor should consider a suitable alternative exercise recommended by a qualified fitness or healthcare professional.
Another useful modification involves reducing the number of repetitions and focusing on movement quality. Start with a manageable amount that allows you to maintain steady breathing and controlled hip movement. As the exercise becomes more familiar, gradually increase the amount of work according to your comfort, training experience, and overall exercise routine.
Best Glute Bridge Variations to Try
The single-leg glute bridge is a more demanding variation that challenges hip strength and pelvic control. It involves lifting one leg while performing the bridging movement with the other foot planted on the floor. Because this version increases stability demands, it is best introduced after you can perform standard glute bridges comfortably and consistently.
Banded glute bridges offer another way to modify the exercise by adding light resistance around the thighs. A suitable exercise band can encourage attention to knee alignment and increase the work required from certain hip muscles. Keep the band positioned securely and avoid forcing your knees outward, as controlled movement remains more important than resistance.
Weighted glute bridges provide an option for people who have already developed consistent bodyweight technique. Appropriate resistance can increase the challenge for the hip extensors, but it should not compromise spinal positioning or breathing. Begin conservatively, use securely positioned equipment, and seek qualified instruction when learning unfamiliar resistance-based variations to maintain proper control.
Glute Bridges vs. Hip Thrusts: What’s the Difference?
Glute bridges and hip thrusts both strengthen the hip extensors through a similar lifting movement. The main difference involves body positioning and the available movement range. Standard glute bridges are performed with the upper back resting on the floor, while hip thrusts typically involve supporting the upper back against a stable bench.
Hip thrusts often allow a greater range of hip movement and can be loaded with additional resistance. This makes them a useful option for people who want to develop strength through a wider movement range. However, correct bench positioning, equipment stability, and suitable resistance are important for performing hip thrusts safely and effectively.
Glute bridges may be easier for beginners because they require less equipment and involve a simpler setup. Both exercises can contribute to lower-body strength when included appropriately in a balanced training program. Choosing between them depends on personal comfort, available equipment, movement experience, and whether your priority is learning basic control or progressing resistance training.
How to Include Glute Bridges in Your Workout Routine
Glute bridges can be included in a warm-up to practice hip movement before exercises such as squats or lunges. A few controlled repetitions may help you focus on coordinating your hips and trunk. However, warm-up exercises should prepare your body for the activity ahead rather than create unnecessary fatigue before the main workout begins.
For general strength training, beginners might start with one or two sets of approximately eight to twelve comfortable repetitions. This is a flexible starting point rather than a requirement, and the appropriate amount depends on individual ability. Allow enough recovery between sessions and adjust the difficulty if your technique becomes inconsistent or the exercise causes discomfort.
Glute bridges work well alongside other movements that strengthen different parts of the lower body. Exercises such as supported squats, step-ups, and gentle mobility activities can provide a more varied training experience. Instead of depending on one exercise alone, combine appropriate movements to support balanced strength, coordination, and comfortable daily physical activity.
Safety, Recovery, and Progression Best Practices
Glute bridges are generally accessible, but they may not be appropriate for everyone in every situation. Stop the exercise if you experience sharp pain, unusual symptoms, or discomfort that increases during movement. People with recent injuries, significant back or hip problems, or medical restrictions should seek individualized guidance before adding unfamiliar strengthening exercises.
Recovery is important because muscles need sufficient time to adapt to new physical demands. Mild muscle fatigue may occur when introducing an unfamiliar exercise, but persistent pain should not be ignored. Support your training with adequate rest, regular meals, hydration, and a balanced approach that allows you to maintain comfortable movement throughout daily activities.
Progress gradually by improving technique before increasing repetition numbers, resistance, or exercise complexity. Once standard glute bridges feel controlled and comfortable, you may experiment with a suitable variation or slightly greater challenge. Consistent practice and appropriate recovery are more useful than rushing into advanced exercises, especially when your goal is sustainable strength and movement confidence.
Conclusion
Glute bridges are a practical strengthening exercise that targets the gluteal muscles while involving the hamstrings and core stabilizers. Their simple setup makes them useful for beginners and experienced exercisers alike. With proper technique, they can support hip strength, improve movement control, and complement a variety of balanced fitness and mobility routines.
The most important part of performing glute bridges is maintaining comfortable, controlled movement. Keeping your feet stable, knees aligned, and lower back from excessively arching helps direct the exercise toward the intended muscles. Starting with manageable repetitions and introducing modifications gradually can make the movement easier to learn and maintain consistently.
Whether you use glute bridges during a warm-up or as part of a strength workout, quality matters more than quantity. Pay attention to your technique, allow suitable recovery, and choose variations that match your experience. With consistent, thoughtful practice, glute bridges can become a useful part of your long-term physical activity routine.
Frequently Asked Questions (FAQs)
What Are Glute Bridges Good For?
Glute bridges primarily strengthen the gluteal muscles and support hip extension. They can also improve pelvic control and provide a useful foundation for everyday movement, lower-body exercise, and selected rehabilitation programs.
How Many Glute Bridges Should I Do a Day?
There is no required daily number of glute bridges. Beginners may start with one or two sets of eight to twelve controlled repetitions, adjusting the amount according to comfort, recovery, and individual fitness needs.
Do Glute Bridges Help With Lower Back Pain?
Glute bridges may support hip strength and trunk stability, but they are not a universal treatment for lower back pain. Anyone experiencing persistent or worsening symptoms should seek professional assessment before relying on exercise for relief.
What Is the Difference Between Glute Bridges and Hip Thrusts?
Glute bridges are performed with your upper back on the floor, while hip thrusts typically use an elevated bench. Hip thrusts often provide a greater movement range, although both exercises target the hip extensors.
Can Beginners Do Glute Bridges Without Equipment?
Yes, beginners can perform standard glute bridges using only a comfortable, stable floor surface. Start with controlled movements, adjust the lifting range as needed, and focus on correct positioning before trying more challenging variations.